Last night I was scrolling through my Instagram account and I found an old lady making something delicious. Then I went to the comment box and it looked like she was making something really special. It seemed like a very popular appetizer that everyone raved about. This thing made me curious – how could someone from a different generation understand our tastes so well?
She was making a Corn Dip Recipe and her name was Brenda Gantt.
I could not stop making this recipe for myself because her every movement and expression reminded me about my grandmother and my childhood together when we spent time in the kitchen.
So at the time I planned to make this Brenda Gantt’s Corn Dip Recipe and I was surprised this recipe is so easy to make. The dip is a harmonious blend of creamy, crunchy, sweet, and spicy, making it highly addictive and crowd-pleasing.
If you’re looking for what to serve with this Corn Dip Recipe then Egg Rolls Recipe works great. Also serve with Chicken Tortilla Soup. The corn dip’s creamy, cheesy, and slightly spicy profile pairs nicely with the warm, hearty, and mildly spicy soup.

Difference Between Gantt’s Corn Dip and Traditional Street Corn Dip
The main difference I noticed between Brenda Gantt’s corn dip and regular street corn dip is the texture and ingredients.
Traditional street corn dip usually has Mexican crema, cotija cheese, and lime juice as the main flavors. But Brenda’s version uses sharp cheddar cheese, mayonnaise, and sour cream which makes it more creamy and rich. Her recipe also includes fresh bell peppers and green onions that give extra crunch and freshness. The traditional version is more tangy because of the lime, while Brenda’s recipe is more comfort-food style with that Southern touch.
What Makes This Recipe Special
What makes Brenda Gantt’s Corn Dip Recipe so special is how she combines simple ingredients to create something amazing.
I watched her make this recipe and could tell she has made it many times before. The way she talks about each ingredient shows her experience.
She mentions this recipe is from her first cookbook on page 168, which means it’s been tested by thousands of people.
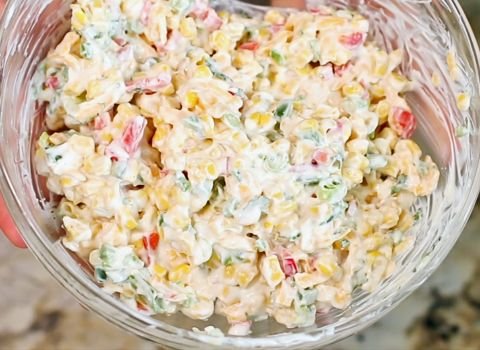
What Is in Brenda’s Corn Dip?
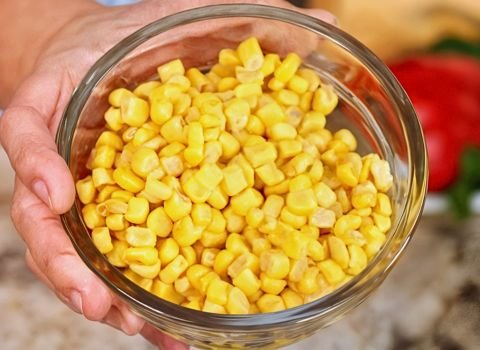
- 2 cans (15 ounces each) of Mexican-style corn with peppers, drained: The corn is sweet and has bits of red and green peppers for extra flavor and color. Draining it keeps the dip from getting watery.
- 1 can (4 ounces) of chopped green chilies, mostly drained: These add a mild, tangy heat that’s not too spicy. I leave just a little liquid for extra flavor, but not too much, so the dip stays thick.
- 3 green onions, thinly sliced: These give a fresh, slightly sharp taste and a bit of crunch. They’re also called scallions in some places, but I call them green onions like Brenda does!
- 1 medium bell pepper, finely chopped: I use a green bell pepper for a crisp texture and a mild, sweet flavor. It adds a nice crunch that balances the creaminess.
- 4 fresh jalapeño peppers, finely chopped (seeds removed): These bring the spice! Removing the seeds keeps the heat mild, but you can use 3 if you want it less spicy. They add a fresh, zesty kick.
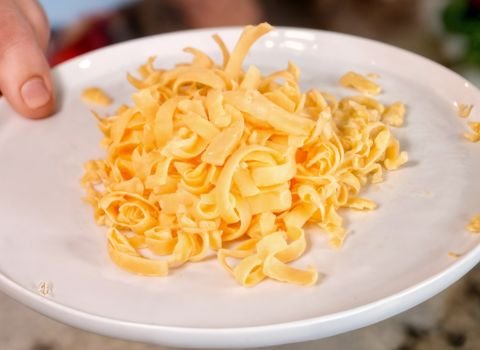
- 2 cups of sharp cheddar cheese, shredded: This gives the dip its cheesy, rich goodness. I shred my own cheese because it melts better and tastes fresher than pre-shredded.
- 1 cup of mayonnaise: Use real mayonnaise, not salad dressing, for a creamy, tangy base. It binds everything together and adds a smooth texture.
- 1 cup of sour cream: This makes the dip extra creamy and adds a slight tang that pairs perfectly with the corn and cheese.
Helpful Swaps and Variations
- If you can’t find corn with peppers, use regular canned corn and add a few spoonfuls of diced pimentos or extra bell pepper.
- For less heat, use fewer jalapeños or swap them for sweet mini peppers.
- Want more spice? Leave some seeds in the jalapeños or add a pinch of cayenne pepper.
- Try using a mix of cheeses, like pepper jack or Monterey Jack, for a different flavor.
- If you don’t have sour cream, Greek yogurt works as a substitute.
- For a lighter dip, use light mayo and light sour cream.
- Add a handful of chopped fresh cilantro for a fresh, herby twist.
- For extra crunch, stir in a small can of drained black beans or diced red onion.
Kitchen Equipment Needed to Make This Dish
- Large mixing bowl: To mix all the ingredients together.
- Can opener: To open the cans of corn and green chilies.
- Colander: To drain the corn and chilies.
- Sharp knife: For chopping the bell pepper, jalapeños, and green onions.
- Cutting board: To keep your chopping safe and clean.
- Cheese grater: If you’re shredding your own cheese (which I recommend!).
- Measuring cups and spoons: To measure the mayonnaise, sour cream, and cheese.
- Spatula or large spoon: For mixing everything together.
- Pretty serving bowl: To make the dip look as good as it tastes!
- Plastic wrap: To cover the dip while it chills in the fridge.
How to Make Brenda Gantt’s Corn Dip
Step 1 | Get your ingredients ready
Open 2 cans of Mexican-style corn and 1 can of green chilies. Drain them in a strainer. Leave a little juice in the chilies for flavor. Set everything aside.
Step 2 | Chop the veggies
Slice the green onions thin. Use both the green and white parts. Cut the bell pepper into small pieces. Take out the seeds and white parts. Cut off the ends of the jalapeños. Slice them in half, scoop out the seeds, and chop them up. Use 3 jalapeños if you want it less spicy.

Step 3 | Shred the cheese
If you’re using a block of cheddar, shred 2 cups. I like to do it myself—it tastes better! But bagged shredded cheese is fine too.
Step 4 | Mix it all up
In a large mixing bowl, Add the corn, green chilies, chopped onions, bell pepper, and jalapeños. Then add 2 cups of shredded cheese, 1 cup of mayo, and 1 cup of sour cream. Stir it all until it looks smooth and creamy.
Step 5 | Taste and adjust
Try a little bite. If you want more heat, add another jalapeño or a small pinch of chili powder. If it’s too thick, stir in a spoonful of sour cream.
Step 6 | Chill the dip
Cover the bowl with plastic wrap. Put it in the fridge for at least 2 hours. This helps the flavors mix and makes the dip nice and cold.
Step 7 | Serve it up
Spoon the dip into a bowl. Serve cold with corn chips or tortilla chips. Enjoy!

Tips for Perfection
- Always use real mayonnaise, not salad dressing, for the best flavor.
- Chop the vegetables very small so you get a bit of everything in each bite.
- If you want a milder dip, remove all seeds from the jalapeños or use fewer peppers.
- For extra flavor, let the dip chill in the fridge overnight.
- Stir the dip well before serving to make sure everything is mixed evenly.
- Taste before serving and add a pinch of salt or pepper if needed.
What to Serve with Corn Dip
Brenda Gantt’s Corn Dip is easy to enjoy with lots of dishes. At home, I like to enjoy it with thick corn chips or tortilla chips. They don’t break and pick up the dip nicely. You can also try it with carrot sticks or celery if you want something fresh and crunchy.
Sometimes, I serve it with egg rolls. The crispy rolls and creamy dip go really well together. It also tastes great with a warm bowl of chicken tortilla soup. The dip adds a cheesy, spicy kick that matches the soup.
You can even use this dip as a topping. I spread it on tacos or baked potatoes.
Make Ahead Tips
This corn dip is great to make ahead. I actually think it tastes even better the next day! The flavors mix together more, and the dip turns out extra tasty.
You can make it 1 or 2 days before you need it. Just cover it well and keep it in the fridge. Before serving, give it a good stir—sometimes a little liquid settles on top, and that’s normal.
If you’re getting ready for a party or family dinner, this helps a lot. You can check it off your list early! The veggies still stay fresh and crunchy, even after sitting overnight. Just wait to add the chips until right before serving so they don’t get soft.
How Long Corn Dip Lasts in the Fridge
You can keep this corn dip in the fridge for 3 to 4 days. Make sure it’s covered well—use plastic wrap or a container with a tight lid. After 4 days, it won’t taste as good and the veggies might get soft. I like to write the date on the container so I don’t forget when I made it.
If the dip smells bad or looks too watery, it’s time to throw it out. Since it has mayo and sour cream, it doesn’t last too long. For the best taste and texture, try to serve it within 2 days.
Brenda Gantt’s Corn Dip Recipe FAQs
1. Is Brenda Gantt’s Corn Dip served hot or cold?
This dip is typically served cold. That’s what gives it that creamy, refreshing texture. Chilling the dip for a few hours or overnight allows the flavors to blend. However, if you prefer a warm version, you can bake it at 350°F for 15–20 minutes until bubbly and slightly browned.
2. Can I find all the ingredients at a regular store?
Yes! All the ingredients—Mexican-style corn, green chilies, mayo, sour cream, cheddar, and fresh veggies—are available at most standard grocery stores.
3. How can I make this dip for a large party or crowd?
To make this dip for a big group, simply double or triple all the ingredients. Use a large mixing bowl and store in a deep dish or multiple containers.
4. Is this the exact version from Brenda Gantt’s cookbook?
While this version closely follows Brenda Gantt’s original recipe featured in her cookbook and social media videos, there may be minor home adaptations. The core ingredients and preparation method match what she shares publicly, but viewers sometimes adjust spice or cheese based on personal taste.

Brenda Gantt's Corn Dip Recipe
This Brenda Gantt Corn Dip Recipe takes 15 mins to prep and is packed with cheesy flavor and mild spice. Great for parties, picnics, or snacks!
Ingredients
- 2 cans (15 oz each) Mexican-style corn with peppers, drained
- 1 can (4 oz) chopped green chilies, mostly drained
- 3 green onions, thinly sliced
- 1 medium green bell pepper, finely chopped
- 4 fresh jalapeños, finely chopped (seeds removed; use 3 for less spice)
- 2 cups sharp cheddar cheese, shredded
- 1 cup mayonnaise (use real mayo, not salad dressing)
- 1 cup sour cream
Instructions
Step 1 | Get your ingredients ready
Open 2 cans of Mexican-style corn and 1 can of green chilies. Drain them in a strainer. Leave a little juice in the chilies for flavor. Set everything aside.
Step 2 | Chop the veggies
Slice the green onions thin. Use both the green and white parts. Cut the bell pepper into small pieces. Take out the seeds and white parts. Cut off the ends of the jalapeños. Slice them in half, scoop out the seeds, and chop them up. Use 3 jalapeños if you want it less spicy.
Step 3 | Shred the cheese
If you're using a block of cheddar, shred 2 cups. I like to do it myself—it tastes better! But bagged shredded cheese is fine too.
Step 4 | Mix it all up
In a large mixing bowl, Add the corn, green chilies, chopped onions, bell pepper, and jalapeños. Then add 2 cups of shredded cheese, 1 cup of mayo, and 1 cup of sour cream. Stir it all until it looks smooth and creamy.
Step 5 | Taste and adjust
Try a little bite. If you want more heat, add another jalapeño or a small pinch of chili powder. If it's too thick, stir in a spoonful of sour cream.
Step 6 | Chill the dip
Cover the bowl with plastic wrap. Put it in the fridge for at least 2 hours. This helps the flavors mix and makes the dip nice and cold.
Step 7 | Serve it up
Spoon the dip into a bowl. Serve cold with corn chips or tortilla chips. Enjoy!
Nutrition Information:
Serving Size:
(Per Serving, based on 12 servings)Amount Per Serving: Calories: 275Total Fat: 23gSaturated Fat: 7gCholesterol: 30mgSodium: 330mgCarbohydrates: 11gFiber: 1gSugar: 3gProtein: 6g